RSS
Showing posts with label Punch art. Show all posts

Tuesday, 18 May 2010

New Colours in Action!


I know...it's been a while since I've blogged but what can I say...I seem to spend all my time these days planning lessons , marking books etc etc. So tonight I finally found time to make a card AND post - woohoo!
I have three cards for you, showing off the gorgeous new colours.
The first one is yet another version of Monica's design...sorry...I just really like it and I think you'll like this one too.

The colours on this photo are pretty rubbish as you'll realise when I tell you that the green is olive green, so apologies for that.
Here's the recipe:
Rich razzleberry and olive green cardstock
Olive green satin ribbon
Cottage Wall designer series paper
Punches and stamps as below


This one is based on Dawn's design here where you can see a video showing you how to make the little paper frame. The products on this one are pretty similar to the first one:
Rich razzleberry cardstock, Garden Wall DSP, old olive satin ribbon
Butterfly, Boho Blossoms, eyelet border and word window punches
silver brads.
The sentiment is from Pocket Silhouettes


And here's the third one....

Melon mambo, rich razzleberry, basic grey and whisper white cardstock
Melon mambo polka dot ribbon
Bloomin with beauty and whimsical words stamp set
Rich razzleberry, melon mambo and old olive inks

Thanks for looking, Anne

Saturday, 1 May 2010

The 2 Step Bird Punch

Here's a card I made in 2 colourways cased from one of Monica's and no I haven't lost my arbles, it really has been made using the 2 step bird punch!


Obviously I used the leaf from the bird punch and the flower petals are the wing.
The card on the left is made using old olive and pink p[assion cardstock and inks. The ribbon is the new old olive satin ribbon and the paper is the new Night and Day.
The card on the right is bordering blue and Summer sun card and ink. The paper is from the Bella Bleu set.
The sentiment is from Oval All.

Sunday, 25 April 2010

Another card by Carrie

Couldn't resist sharing this one of my daughter, Carrie's with you. She's obviously inherited her mother's talent. Lol.
For those of you who don't know me so well and may be a little confused, there are two Carries - one's my daughter and the other is a friend who I work with.
Anyway back to the card. Carrie's used various punches to create this cute lion (mine of course), but the one I thought the cleverest was the tail where she's used the leaf from the new bird punch. What do you think?

Monday, 12 April 2010

Cup Challenge

Been a while since I posted, so sorry for that but have been very busy over the Easter hols catching up on all the work I missed while I was off sick. So now it's back to school and the uphill struggle to the end of the school year and those well-earned Summer hols.

Anyway I participated in the Cup Challenge over on the In Love With Stamping website on 3rd April. It was great fun but very stressful. At 5pm we all registered and were randomly put into teams - I was in the Owls. Starting at 7pm, a challenge was issued every hour until 11pm. The teams had to design and upload as many cards as they could within the hour. The team with the most uploaded cards won. You can see them all in the ILWS gallery here and now here are my efforts!

The first challenge was to use the babywipe technique. Now if you've never heard of that, you get a dried babywipe and dot colours from your re-inkers onto it, making your own multi-coloured inkpad. Here's my results.


I used re inkers from  Earth Elements. The butterfly card was made with ruby red, certainly celery and very vanilla cardstock. I used the Leaves a la Carte jumbo wheel with Mellow Moss ink for the background and Flight of the Butterfly stamps.
The snails came from the new Fox & friends stamp set, the card  stock is cameo coral, very vanilla and old olive. The greeting is from Cheer & Wishes.


Challenge 2 was 'Something old, something new, something borrowed, something blue'. The borrowed could be anything crafty borrowed or something 'borrowed from around the house. Luckily I'd borrowed the Garden Whimsy stamp set so didn't have to do anything bizarre!
                                                                                          
                                                                                         
 So the stamp set is Garden Whimsy (borrowed), the old is the backing paper (non SU), the new is the brad from the Pretties kit and the blue.......
The card stock is night of navy and the Hello is from Basic Phrases, stamped and punched out with the word window punch.
The second one for this challenge is night of navy card stock again and night of navy and real red ink. The old is my corner rounder punch, the borrowed is the ladybird from the Garden Whimsy set again, the new is the Vintage Vogue stamp set and also the red satin ribbon (both can be found in the new mini catalogue).


The 9 o'clock challenge was to incorporate punchart. I nearly died when I saw this one as I've only ever copied other people's punchart before! However, I gave it my best shot and came up with these which I was really quite pleased with in the end.


So what do you think??????
The bird card  is taken with teal and more mustard card stock and the backing paper is from the new Autumn Meadows designer series paper. The punches I used were circles, oval, word window and star punch for his beak.
Another demonstrator commented that my little men reminded her of the 118 men, so I'm calling this my 118 card now. The card stock is very vanilla, real red, blush blossom, close to cocoa, pumkin pie, bashful blue, garden green and pretty in pink. The punches were circles and scalloped circle and the moustaches are the butterfly punch cut in half.

I was out my comfort zone a bit with the next challenge too. They were supposed to get easier, but I , for one, certainly didn't think they were, unless I was just getting tired. Back to the challenge which was to doodle on the card. I don't like doodling as I like everything to look neat and tidy and tend to spoil my cards if I do anything freehand. So here they are again.

I was quite pleased with the tree with the doodled flowers but not so happy with the doodled scallops which close up don't look very good.
The cardstock  for the tree one is pumpkin pie, basic black and whisper white. The inks are garden green, chocolate chip, sunshine yellow, only orange and glorious green. The stamp sets are Lovely as a Tree and Touch of Nature.
The second card was made using whisper white and pink passion cardstock and pink passion ink. The ribbon is whisper white 1/4 ins grosgrain and the stamp is from the Simply Said set.

And finally, the last challenge which was issued at 10.30 and not 11.00 as everyone was struggling to stay awake by this time was inspired by a picture which you can see here. As I wasn't feeling very inspired by this time I grabbed the nearest stamp set, went for the colour them and produiced this.....

The colouring in is appalling as my eyes were doing their own thing by that time of night.
The cardstock is whisper white, only orange, pink passion and green galore. The inks are the same plus summer sun and the stamp set is Bloomin with Beauty.

Well hope you enjoyed seeing my Cup Challenge efforts. Despite the stress and fatigue, I can thoroughly recommend participation. the challenges are open to everyone, not just demonstrators so watch out for next month's which I will post using a blinkie on the left of my blog.

Tuesday, 2 March 2010

Lacy Fan

Today I used my large tag punch to make this lacy fan design and I am going to attempt my first tutorial so you can have a go too if you wish to. 


What you will need:
Large tag punch
Two shades of card ( I used apricot appeal and blush blossom)
Clear Versamark ink pad
Gold embossing powder
Heat gun
Simply Said stamp set


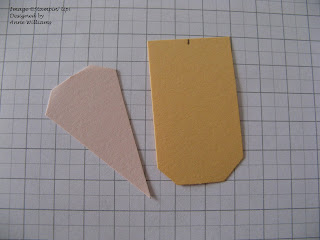
First cut your card into 3cm wide strips. Then thread them through the tag punch, punching one end.


These need to be trimmed to 5cm long. Then mark the centre of the 3cm side and cut diagonally from the mark to the corner at the other end of the strip.


After that using the multi-flower stamp from the Simply Said set, randomly stamp each piece using the Versamark and emboss with gold embossing powder.


Place a dimensional or sticky pad on each piece as shown.


Stick the first piece in postion using only the sticky pad. Line the second piece up to it.


Then holding down the centre points, slide the second piece so that it just overlaps the first, sticking down with the sticky pad only again.


Repeat until all the pieces are in place.


I then stamped and embossed the 2 step flower from the Simply Said set, using apricot appeal for the first step and glued it in place over the points of the fan. The glue also serves to hold the fan points in place. Finish by adding a flat back pearl to the centre of the flower.


Then mount and complete the card as desired. I used the sentiment from the Simply Said set too.


Hope this all makes sense. Please let me know if it doesn't!

Friday, 26 February 2010

Something simple

Seems ages since I blogged, probably because it is! Obviously we are back from sunny Tunisia after a 4 hour delayed return flight. Still, at least we had relaxing break.
Today I have a couple of cards which I intend to make with the children at school. I'm not going to list the products as they're not all SU, but I think you c an easily see how they are made.

So here's the first one.


And the second one is a little more interesting and definitely cute. :)