RSS

Tuesday 30 March 2010

Announcing the arrival of the new Mini catalogue!


I have been very busy the past few days using some of the gorgeous  products from the new Mini Catalogue. I am about to share my designs with you but before I do, i must thanks all the demonstrators who participated in the 3 Mini Catalogue Hops on Sunday as they were so inspiring. I will add a link to the hops at the end of my post so you can go and see for yourself if you haven't already. That said, I have cased several of the cards I saw and cannot for the life of me remember whose some of them were, so, demonstrators, if you spot one similar to one of your own, let me know and I'll add the link to your blog.

I'm not going to give full detaiuls of all the products I've used or I'll be here all day!. I'll just liost the new products from the Mini. These are all available to buy and cna be ordered from 1st April. Contact me to place an order.


Product - Night and Day Designer Series Papers. These include the black spotted acetate as used on the one on the left.

The one on the left is cased from Lorraine's card.


Products: Fox & Friends stamp set, Two-step bird punch
The one on the right is cased from one of Peg's cards.


Products: Fox & Friends stamp set, Sweet pea Designer Series Paper
The one on the right is cased from Elaine's card.


Products: Fox & Friends stamp set, Autumn Meadows Designer Series paper, Chocolate Chip satin ribbon


Products: Bird punch, Sweet Pea Designer Series Paper
This cases from Jo's card


Products: Bird punch, Vintage Vogue stamp set
This is cased from Monica's card.


Products: Night and Day Designer Series Paper, Vintage Vogue Stamp Set, Small heart punch, Real Red satin ribbon

Hope you enjoyed them. Here's the link to the blog hops.

Wednesday 17 March 2010

Tart and Tangy

I have finally got round to using one of my new stamp sets - Tart and Tangy. I think this is a really cute and versatile set. So I had a lovely couple of crafting hours with my daughter and these are what we came up with. They are all loosely based on the same theme. Carrie designed the strawberry and cherry ones cos I I hate strawberries, although I love cherries and I designed the orange and apple ones.


Here's the products:

Strawberry - real red and close to cocoa card, close to cocoa paper from the Love Stories Scrappin pack, real red and handsome hunter ink stamp from Circle Circus for the background

Cherry - Elegant eggplant and always artichoke card and ink and mellow moss card, Circle Circus stamp set.

And here's mine.


Orange - pumpkin pie and close to cocoa card, close to cocoa paper from Love Stories Scrappin pack, pumpkin pie ink and Circle Circus stamp for the background

Apple - Green galore, certainly celery and real red card, real red, green galore and mellow moss ink. The background stamp is from Seeing Spots and the leaf stamp is from Lovely as a Tree. To get the two tone apples I have used the rocking and rolling method which you will find in your techniques booklet or on the Stampin' Up website.

The sentiment used on all cards is from Cheer & Wishes.

Saturday 13 March 2010

Signs of Spring

Well I hope so anyway!
I have 2 butterfly cards for you today, both made using the Flight of the Butterfly stamp set and the butterfly punch which are in this month's Perfect Pairs promotion.
Buy the stamp set for £23.95 and you will get a whopping 20% reduction on the matching butterfly punch.
(For other stamp sets and punches in this promotion please click on the Perfect Pairs image on the right)

Both my cards are cased from Monica's lovely creation which you can see here.

The first one is more or less an exact copy using regal rose, old olive and whisper white card stock, regal rose, old olive, certainly celery and basic black inks and old olive ribbon.
As well as the Flight of the Butterfly stamp set, I have also used Pocket Silhouettes.

The second card card stock is only orange and green galore. The paper is from the Sunny day scrapping kit. The inks are green galore and pink passion and I've coloured some white ribbon using my pink passion marker pen. The sentiment is from Basic Phrases and I've used the word window punch for it.


Haitian Relief Results

This fantastic news has been posted on the Stampin Up!  website

Once again, Stampin' Up! demonstrators have shown what Stampin' Up! is all about by making a difference in the lives of others. Worldwide, demonstrators sold 13,587 of the stamp sets that were set aside for Haitian relief. We are pleased to announce that Stampin' Up! will donate over £18,000 to the Red Cross’ Haiti Relief and Development Fund, providing support to those who desperately need your help. Congratulations!

Thank you all for your efforts!

And special thanks from me personally to all my customers who bought this beautiful stamp set  and gave their support in this way. Hope you continue to have many happy hours playing with the stamps and producing beautiful cards and othe paper craft items.

Tuesday 2 March 2010

Lacy Fan

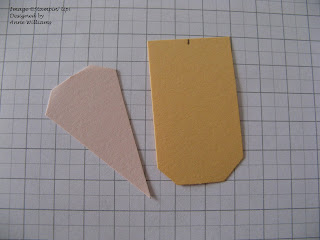
Today I used my large tag punch to make this lacy fan design and I am going to attempt my first tutorial so you can have a go too if you wish to. 


What you will need:
Large tag punch
Two shades of card ( I used apricot appeal and blush blossom)
Clear Versamark ink pad
Gold embossing powder
Heat gun
Simply Said stamp set


First cut your card into 3cm wide strips. Then thread them through the tag punch, punching one end.


These need to be trimmed to 5cm long. Then mark the centre of the 3cm side and cut diagonally from the mark to the corner at the other end of the strip.


After that using the multi-flower stamp from the Simply Said set, randomly stamp each piece using the Versamark and emboss with gold embossing powder.


Place a dimensional or sticky pad on each piece as shown.


Stick the first piece in postion using only the sticky pad. Line the second piece up to it.


Then holding down the centre points, slide the second piece so that it just overlaps the first, sticking down with the sticky pad only again.


Repeat until all the pieces are in place.


I then stamped and embossed the 2 step flower from the Simply Said set, using apricot appeal for the first step and glued it in place over the points of the fan. The glue also serves to hold the fan points in place. Finish by adding a flat back pearl to the centre of the flower.


Then mount and complete the card as desired. I used the sentiment from the Simply Said set too.


Hope this all makes sense. Please let me know if it doesn't!

Monday 1 March 2010

Christmas already??????

At the request of a hostess, I recently demonstrated the heat and stick and dazzling diamonds to make these two cards. The result....Christmas already!

I was pleased with the two different looks. This was achieved by stamping the trees in Kraft white first and then shadowing them in dazzling diamonds. It gave the effect of more trees. The second one was done in reverse - dazzling diamonds first, then Kraft white on top and this gave the shadow effect.


The stamp sets are Lovely as a Tree and Wondrous Gift

Two more cards.

Here's two more cards for you.

The first one is using the Simply Said stamp set featured in this month's Perfect Pairs promotion - buy this one and get 20% off the limited edition full heart stamp. The card is garden green and very vanilla. I have embosssed the flowers in gold and coloured  them in garden green. The sentiment is from Basic Phrases.


This one is the buttefly from Back to Nature and sentiment from Cheer & Wishes and is in one of my favourite colour combinations perfect plum and pale plum. The paper is from the perfect plum Patterns Design Paper Series.

March Promotion - Perfect Pairs


Here's a couple of  Forest Friends cards for you.


This was made using really rust and very vanilla card, close to cocoa ink and Spiced Cider Designer Series Paper. The sentiment is from the basic Phrases stamp set.

The next one is ruby red, creamy caramel, and garden green card, chocolate chip and garden green ink and the eyelet border, round tab and word window punches. The sentiment is from  Basic Phrases again.